Don’t Starve Together – ユーザー インターフェース ガイド

このガイドでは、ゲームのすべてのボタンと UI について、非常に明白でない限り、詳細でカジュアルな情報を提供します。あなた。
その他の Don't Starve Together ガイド:
- 登場人物のガイド
- グロマーを見つける時期と方法
- The Gorge / クイックスタートと初心者向けガイド
- The Gorge の新しい成果 (Gorge Mastery)。
- 詳細なバイオーム ガイド / 森
- 遊び方:ウェバー
- 遊び方:ウィグフリッド
- Twitch Drops ガイド。
プレイ!
このボタンを押した後、オフラインでプレイするか (ポップアップの [オフラインでプレイ] ボタンをクリックして)、オンラインでプレイするか (待機のみ) を選択できます。
オフラインでプレイすると、スキンにアクセスでき、他のサーバーに参加することはできません。 (もちろん)

ゲームを見る
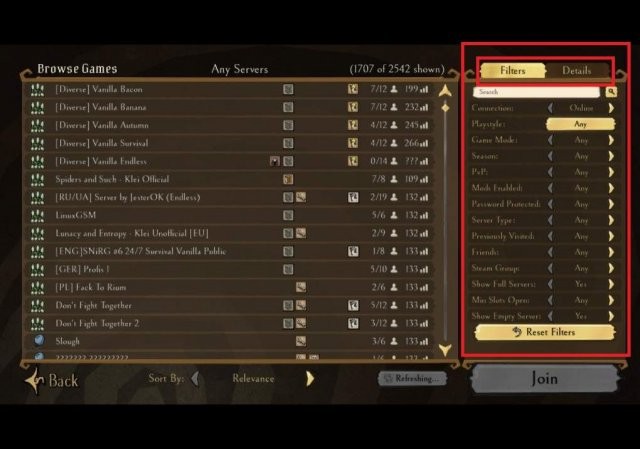
右側に 2 つのタブを含むサーバー リストが表示されます。
フィルタ:
- 接続:オンライン/ローカル サーバーを検索します。
- プレイ スタイル:特定のサーバー スタイルを選択して表示します。全部で 4 つのスタイルがあります。社交的、協力的、競争的、狂気。関係ない?新しいページで「任意」を押してください。
- ゲーム モード:サバイバル、荒野、またはエンドレス サーバーのみを表示するように選択します。
- 季節:選択した季節に現在 (リアルタイム) にあるサーバーを表示します。
- PvP:プレイヤー対プレイヤーが有効かどうか。
- Mods Enabled:改造されたサーバーを表示するかどうか。 (改造されたサーバーは、遅延、クラッシュ、または低 FPS を引き起こす可能性があります)
- パスワード保護:公開/非公開サーバーの選択
- サーバーの種類 – ホスティング:サーバーは、管理者がプレイ (参加) しているかどうかに依存します。彼らが終了すると、サーバーは閉じられます。専用:サーバーは管理者に依存していませんが、コンピューターに依存しています。高確率で、このサーバーはより長くオンラインのままになります。 (Klei 専用サーバーの前には、特別な色のタイトルが表示されます。)
- 以前にアクセスしたサーバー:以前にプレイしたことのあるサーバーを見つけるため。 (そのサーバーのワールドが再生成された場合、またはサーバーが再起動した場合、このフィルターを「オン」にするとサーバーは表示されなくなります)
- フレンド:Steam フレンド (現在) でプレイしているサーバーを表示/非表示にします。
- Steam グループ:このゲームに関連付けられた [Steam] グループの一員である場合、このフィルターをオンにして関連するサーバーを表示できます。
- (残りは明らかです)
- [フィルタをリセット] をクリックすると、デフォルト設定が復元されます。
詳細:
リストからサーバーを選択 (左クリック) して、それぞれを表示します:
- 1.サーバー名
- 2.管理者によって書かれたサーバーの説明
- 3. Mod:レンチのロゴで表示。ワークショップへのショートカットを提供します。
- 4.タグを表示:タグのロゴで表示されます。投票キックまたは洞窟が有効になっている場合など、サーバーの言語に関する情報を提供します。
- 5.世界を表示:地球で表示されます。サーバーを作成したときに管理者によって編集された/編集されていないワールド設定ページが開きます。 (たとえば、猟犬の攻撃が有効になっているかどうかを確認するため。)
- 6.グループ プロファイルの表示:赤い旗で表示されます。これにより、Steam の関連するグループ ページに移動します。
- 7.プレーヤーの表示:匿名のアバターによって表示されます。サーバーで現在プレイしているプレイヤーを確認します。プレイヤー名の前にあるコンロッドをクリックすると、Steam のプロフィール ページに移動します。
- 8.サーバー名の切り替え:いくつかの星 (*) で表示されます。選択したサーバーの名前を星 (*) で表示します。
- 9. Endless、Survival、Wilderness の前の疑問符は、これらのトピックに関する詳細情報を提供します。
- 10.季節。
- 11.サーバーが進んだゲーム内日数
サーバーに参加するには、リストからサーバーを左クリックで選択し、[参加] ボタンを押します。または、リストでサーバー名をダブルクリックします。

ホスト ゲーム
独自のサーバーを作成し、オンライン/オフラインで、単独で/一緒にプレイするページに移動します。左側には 5 つのスロットがあります。それぞれに、あなたが作成した独自の世界があります。
世界の作成を開始するには、まずホーム スロットを選択します。
ワールド作成ページには、これらのタブとオプションが含まれています。
設定:
- サーバー プレイ スタイルを選択します。
- 公開されているサーバー名。 (設定による)
- 公開されている説明。 (設定による)
- サーバーを公開、友達のみ、ローカルのみにすることを選択します。または Steam グループ
- パスワードを入力してください。 (パスワードを共有しない場合は、パスワードを覚えておく必要はありません。再入力せずにワールドを再開できるため、パスワードを後で削除することもできます)。
森:
ここでは、上部の世界をカスタマイズするか、デフォルトのままにしておくことができます。これらの設定は、すべてのバイオームを含む上位世界に属しますが、洞窟には影響しません。
洞窟:
[洞窟を追加] を選択すると、[森] タブに同様のページが作成されますが、アンダーワールドの設定を変更することしかできません。洞窟を有効にしてサーバーを問題なく実行するには (クラッシュ/ラグ/FPS ドロップ)、十分な量の PC リソースと適切なスペックが必要です。
同じページの [洞窟を削除] ボタンをクリックして、サーバーで無効にしてください。
ロールバック:
5 つの異なるゲーム内日付を表示し、選択した日付を選択してロードします。最初に確認を求めます。 (はい/いいえ)
アイテム コレクション
最初のページ
- 旅の歴史:このゲームでかつて生きていた過去のすべてのイベントと、関連する実績を表示します。参加したことがある場合は、進行状況も表示されます。
- 最近の発見:
最後に受け取ったアイテム/宝箱を表示します。 - スプール:
現在持っているスプールの量を表示します。 - 頻繁に殺される:
どのモブ/状態に最も失敗したかを示します。 (あまり正確ではありません。) - 最も友好的な友達:
最もよく一緒にプレイしたプレイヤーからユーザー名を選び、表示します。 (あまり正確ではありません。)
キュリオ キャビネット
ワードローブ:キャラクターを選んで衣装をカスタマイズできます。 (Elegant survivor head items can only be found here and in Steam inventory.)
After clicking on a character, in the new page, At the right side of the screen, Above the default avatar of the character’s head, there are buttons (Filters):
A. The save Icon near the Spool image:shows the “Clothing Presets”. After customizing your looks for the current character, click on it and pick a slot to save the current set, for easy access later in the game/ fast clothing switches; You can choose (wear) a set by clicking on the green tick.
B. Head – Shows the Skins that affects character’s overall appearence, including head and hair. (Rarity:Only Elegants and Heirloom Elegants.)
C. Body – Shows outfits from all rarities that affect the body. (Sometimes they are overalls)
D. Hands – Shows gloves.
E. Legs – Shows pants.
F. Feet – Shows shoes.
The “Undo Changes” button below the character’s model, will only undo the current modifications. (It will not remove all outfits.)
You don’t need to manually change your modifications (Except when you are saving presets). If you are done customizing, click “Accept Outfit” at the left side. You may need to adjust filters again in each section.
Belongings:
Shows the Skins for tools, weapons, wearings, pets and buildings. The cart logo near the scroll, will take you to shop, and adjust the filters of it automatically, based on the item you are currently viewing.
Emotes:
These are the animations like dances that your character performs at public. (Psst! you don’t need to write a command in chat to do emotes; there is a mode for that.)
Emoticons:
These are the emojis you send at in-game chat. Can be used by writing the command that is described in the same page, or by using mods.
Portrait Frames:
Shows and selects the background image for the characters. (Select for each character, by using the arrows under the model.)
Profile Icons:
Shows and selects the tiny avatar near the background, for the characters. (Select for each character, by using the arrows under the model.)
Vignettes:
Shows and selects the images shown in all loading screens. (Apart from the one when you start the game.) Select which photos to be shown by clicking on them on the right side. Green check means it’s selected.
If more than one photos selected, game will randomly choose and show on each time.
Filters:
- Owned Filter, With Chest logo:If turned on, will show only the items you own, if turned off, will show all related and available Skin items.
- Weaveable Filter, With Spool logo:If turned on, will show the items that can be weaved using your Spools. If turned off, you will also see items that cannot be weaved by Spool.
- Survivor Filter:If enabled, will only show items that are introduced to belong to a specific character. (Which is the one you are currently modifying.)
- Sort Mode:Sorts items by:
- Owned Count:(It’s good for finding duplicates.)
- Release Date:Sorts based on item’s release date. (Good for finding event items.)
- Rarity:To find most precious items.
- Name:To find a specific item.
Buttons:
- Unravel:Takes (Deletes) the selected Item from your inventory, and gives back the mentioned amount of Spool.
- Weave:Takes mentioned amount of Spool from you, and unlocks the item.
- Con-rod:Will take you to Steam community market, associated with the selected item.
- Ensemble:If you see this button when selecting an item, it means that the item is part of a collection, that if it’s completed (Collected all related items), it will reward you with the mentioned item. To see the collection items and the reward, click on this button and read the pop-up.
Treasury
Shows Chests. (It’s often empty, unless there is an event running.)
History
Encounters:
- To find/ remember a player you’ve played with before in a server.
- “View Player” Button will lead to selected player’s Steam profile.
- “Remove Player” Will delete their history from this page.
Obituaries:
Recorded history of your fails (Deaths) with info about the server you’ve played in, the cause and in-game survival days.
Trade-Inn
The con-rod icon on the right side will take you to Steam community market, all items for DST.
Your owned trade able items is shown in the left side. You need to pick at least 6 of them, and click Trade button to receive only 1 item in higher quality. The trade is between you and the game.
(Using this trade section is not recommended.)
Redeem Codes
If you’ve purchased a If you’ve purchased a merchandise that promised an in-game code, then you should enter that code here to receive an exclusive item/ Skin.
Shop
You can adjust the filters at left side.
“Buy Now” buttons will cause a Steam Transaction pop-up.
Options
Settings
Input Device:Select the device you are playing with. If a controller is connected, it will show up here.
Vibration:Enable or disable camera vibration.
Sound FX Volume:Sounds of button pressing, and all in-game action sounds. (Such as chopping a tree.)
Music Volume:Default game’s music. (Will play time to time in-game, not always.)
Ambient Volume:Background noises of birds, water, wind, etc.
Show Passwords:Whether or not to display passwords in filtered star (*) format, when creating servers, or joining one.
Auto Subscribe Mods:If enabled, will download all the related server mods that are enabled in a modded server, if you join it. Otherwise, you will need to manually download them from Steam Workshop.
Wigfrid’s Umlauts:When the character Wigfrid is quoting, and mentioning the letter O, she will mention it as Ö if the this option is enabled. Otherwise you will never see the letter Ö.
HUD Size:Determine the size of the crafting and inventory tab in-game.
Data Collection:Read the Privacy Policy for more info. By default, it’s on, otherwise, you will not be able to play online.
Screen Shake:Choose if screen shakes when giants moving nearby or the player is taking damage.
Distortion:To enable/ disable distortion of in-game animations/ images.
Bloom:To enable/ disable bloom of in-game animations/ images.
Full Screen:If enabled, has 3 sub-settings:Resolution, Display and Refresh rate.
Small Textures:It’s the quality of textures; if you have high spec PC, turn it off, otherwise, turn it on.
Notebook Mode:Another option that reduces details of some animations/ images in-game. Enable For low spec PC.
Controls
The only notable option here is the Attack and Force Attack settings. If you don’t want to press two different buttons to attack something, simply change both of these to a single button (Recommended, F). It may cause some problems (Like attacking walls when nearby) but you will get used to it eventually.
Mods
Get Mods: Shows mods that you may/ not own. Clicking on any of their names/ “More Mods” button will lead you to Steam workshop.
Server Mods: These are attached to your server/ world, and others can’t join if they didn’t subscribe to them, if enabled.
– Shows server mods that you’ve currently subscribed to.
Client Mods: These are your personal mods that you can carry to all other servers.
- Shows client mods that you’ve currently subscribed to.
- To enable/disable any of mods, check/clear the checkbox near it.
- The bolt logo under the mods name indicates if it’s configurable or not. If it contains a bolt logo, click on the mod, and then at the right side of the screen click on the bigger bolt logo to configure the mod.
- The more info button (Globe Logo) at the right side of screen, Takes you to the mod’s Steam workshop page.
- The sweep logo at left side will delete (Unsubscribe) all your mods in all sections; It will ask for confirmation first (Y/N)
- The three arrows logo near the sweep, will update all your subscribed mods. It will also ask for conformation first. (Y/N)
Main Menu
Under the Quit button, there are 4 shortcuts:
Data – Will take you to your documents – Klei – DoNotStarveTogether file at your PC. (These are backups and hosted worlds.)
Account – Will take you to Klei’s official website, to register, manage your Klei account and it’s settings.
Forum – Will take you Klei’s official forums.
Games – Will take you to Klei’s developer page at Steam.
The rest of the windows shown at right side, are updated regularly, and have different functions and shortcuts attached to them. It’s simply game’s newspaper; You can notified from here, if a new events, twitch drop, updates or sales available.
